Most modern digital storage oscilloscopes have either two or four analog channels. One or two channels suffice for most work, but it is just good to know you have four, notwithstanding the substantial cost differential. As for the digital channel count, it is typically 16, handy when working on a parallel bus. All these digital channels are far less expensive to manufacture than analog channels because the signals are already digitized, so analog to digital conversion with clocks, sampling and all that entails is unnecessary, whereas separate amplifiers, ADCs and DACs are required for each analog channel.
Analog signal acquisition depends greatly on ADC qualities. The sample interval is the time between recorded sample points. The user can adjust the sample interval by turning the horizontal scale knob or by pressing the Acquire button and manually setting the record length in the Acquire menu. There is a tradeoff: A shorter sample interval equates to higher resolution, but the instrument is slowed so there is the possibility of missing infrequent brief anomalies.

The modern digital storage oscilloscope makes use of one default and at least four user-selectable sampling modes:
Sample mode, the default and most frequently used mode, retains the first sampled point from each acquisition interval. Peak Detect mode chooses the highest and lowest samples in two adjacent acquisition intervals. This mode functions only with non-interpolated, real-time sampling. It is useful for displaying high-frequency glitches. High-Resolution mode averages all samples in each acquisition interval. It provides a higher resolution at the expense of a lower-bandwidth waveform. Like Peak Detect, it is compatible only with non-interpolated, real-time sampling. Envelope mode uses Peak Detect mode for each individual acquisition, using the highest and lowest record points over all acquisitions. In Average mode, the user specifies the number of acquisitions to be averaged. Thermal noise, since it is random, cancels out while the periodic waveform is reinforced.
The record length is the number of samples needed to complete a waveform record. The user can adjust the record length by pressing Acquire and using the horizontal and vertical menus.
The trigger point, denoted by an orange T, is the zero-time location in the waveform record. When the user activates Delay mode, the horizontal position is the time interval from the trigger point to the expansion point, which the user can adjust by turning the horizontal position knob. A positive time means that the record is acquired after the trigger point and a negative time means that the record is acquired before the trigger point. The expansion point, denoted by the orange triangle, is the point that the horizontal scale expands and retracts around.
In diagnosing malfunctioning electronic equipment, FastAcq locates and displays signal anomalies that often elude conventional oscilloscope methods, because it is capable of high-speed capture and enhanced display. Here again, the gateway is that high-tech Acquire button. From there, in the horizontal menu, press FastAcq. In the ensuing side menu, toggle FastAcq and press the soft key associated with Waveform Palette. A submenu appears. Multipurpose Knob a permits the user to select Temperature, Spectral, Normal or Inverted. Each of these palettes indicates the frequency of occurrence of transients that are rare relative to normal events.

These unique waveform palettes are clearly illustrated when a noise signal is applied to one of the oscilloscope’s analog inputs.
In the Noise waveform, greater positive- and negative-going peaks, which are farther from the X-axis, are less frequent. Consequently, the various color schemes used by FastAcq are clearly demonstrated. Waveform palettes are also completely intuitive when they are applied to a Gaussian waveform, where the less frequent events are closer to the X-axis.
Besides these acquisition concepts, which are applicable to analog signals, the modern digital storage oscilloscope is capable of displaying serial and parallel bus data. Among many others, serial buses that the oscilloscope can decode and display (using optional application modules available on the manufacturer’s website) are Flex Ray, I2C, SPI, MIL-STD-1553, RS-232, RS-422, RS-485, UART, and USB.
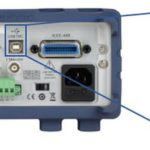
To use serial bus triggering in the Tektronix MDO3000 Oscilloscope, press the B1 or B2 button located above Channel One input. Different buses can be defined in B1 and B2, and they will be displayed simultaneously in the same screen.

Pressing either B1 or B2, the horizontal Bus menu appears. Menu choices, each with a soft key, are Bus, Define Inputs, Thresholds, Label, Bus Display and Event Table. Pressing the soft key associated with Bus, the vertical Bus menu appears with ten bus types. You can select each in turn by turning Multipurpose Knob a.
If USB is selected, for example, pressing the soft key associated with Define Inputs in the horizontal menu opens a vertical menu. Turning Multipurpose Knob a permits the user to select Low Speed (1.5 Mbps), Full Speed (12 Mbps) or High Speed (480 Mbps). Pressing the soft key associated with Signal Type toggles between Differential and Single Ended. For each of these, the next soft key labels analog, digital and reference channels.
Going back to the horizontal menu, pressing the soft key associated with Thresholds opens the vertical channel menu, in which the user can select D+ and D-, the positive and negative threshold levels in volts. Pressing the soft key associated with Label, an on-screen keyboard appears, permitting the user to compose, insert, display and clear labels.
Pressing the soft key associated with Event Table in the horizontal menu, the Vertical Event Table menu appears. The top soft key toggles it on and off. File Details detects removable media such as a flash drive inserted into the oscilloscope USB slot. An on-screen keyboard appears so digital events can be annotated. The bottom soft key permits the user to save the time-stamped Event Table.
To acquire data from an I2C bus, for example, press Define Inputs and the appropriate vertical menu choices. Then, assign the predefined SCLK Input or SDA Input to the channel to which the signal is connected. Press Include R/W in Address and press the desired button in the vertical menu.
This control determines how the oscilloscope shows the I2C addresses in bus decode traces, cursor readouts, Event Table listings and Trigger settings.
Selecting Yes, the instrument displays seven-bit addresses as eight bits because the eighth bit (LSB) is the R/W bit. The oscilloscope displays 10-bit addresses as 11 bits where the third bit is the R/W bit. If you select No, the oscilloscope displays seven-bit addresses as seven bits and 10-bit addresses as ten bits. In the physical layer of the I2C protocol, ten-bit I2C addresses are preceded by the five-bit code, 11110. The oscilloscope does not include these five bits in address readouts.
As another example, to acquire data from an SPI bus, it is necessary to Define Inputs and Configure. First, press Define Inputs and select the appropriate items in the vertical menu. Set the Framing to Slave Select (SS) or to Idle Time. SCLK, SS, MOSI and MISO signals can be assigned to any channel.
Then, press Configure and the desired selections in the vertical menu. Press SCLK to set the edge of the signal to match the SPI bus being acquired. Then set the level of SS, MOSI and MISO signals to match the SPI bus. Active High denotes that a signal is active when it is greater than the threshold value and Active Low denotes that it is active when lower than the threshold value. Multipurpose Knob a sets the number of bits of the word size, such as eight bits. Press one of the vertical menu soft keys to set the bit order of the SPI bus.
Each of the other buses is configured in B1 or B2 in a similarly unique way. To proceed, an understanding of the bus under configuration is required, in regard to both the physical layer and the digital conventions. Parallel and serial buses have been covered in previous articles in this series and may be accessed in our archives.


Leave a Reply
You must be logged in to post a comment.